
Before saving files to a brand new disk, you need to initialize it, create partitions, and format them with a file system. What is the best way to partition a Windows 11 laptop, desktop, or tablet? How many partitions should you create, and what is the appropriate size for each? Since everyone's disk type, size, and purpose are different, the best way to partition a hard drive in Windows 11 is to make a plan tailored to your own needs. You can partition a drive when installing Windows 11 without using any software. If Windows 11 is already installed or the partitions were allocated by the computer manufacturer, you can repartition the hard drive without losing data.
Best Way to Partition Hard Drive in Windows 11 Computer
1. How Many Disks Should I Connect to a Windows 11 Computer?
Answer: At least 2. There are two main types of internal hard disks: traditional mechanical disks (HDD) and Solid State Drives (SSD). Mechanical disks are much cheaper and larger, but they are much slower. SSDs are more expensive, but their read and write speeds are vastly superior to traditional mechanical disks. The best strategy is to use at least two disks: 1 SSD for the operating system and programs, and at least 1 large mechanical disk for personal files.
2. How Many Partitions Should I Create in Windows 11?
Answer: At least 2 partitions on an SSD, and any number of partitions on a mechanical disk. Many people install programs and save everything to the C drive, which is a bad habit. You'd better use the C: drive strictly for the operating system and create a separate volume to install programs. If your SSD is larger than 250GB, you can create a third partition to save specific files that need to load quickly (like games or heavy projects). Do not save everything to the C drive; otherwise, it will fill up quickly, significantly slowing down your computer. On a mechanical disk, you may create 2 to 5 partitions to categorize different types of files. There is no need to create too many partitions, especially if the whole disk is smaller than 2TB.
3. What Size Is Appropriate for the C Drive and Other Partitions?
Answer: In general, you should allocate at least 100GB to the system partition C. If your SSD is 128GB, you can allocate 80GB–90GB to the C drive and give the remaining space to the D drive for programs. If your SSD is 256GB, you can give 120GB to the C drive, 40GB–60GB to the D drive for programs, and the remaining space to the E drive for special files.
The C: drive only uses about 20GB after installing Windows 11, but the used space grows rapidly because various system and application files are saved there continuously. Even if you install programs on a separate D drive, some related cache and configuration files are still saved to the C drive. This is why you should make the C drive as large as possible.
How to Partition Hard Disk (SSD) When Installing Windows 11
First, you should know that Windows 11 cannot be installed on an MBR disk. If you try, you'll receive the error message: 'Windows can't be installed on this disk. The selected disk has an MBR partition table. On EFI systems, Windows can only be installed to GPT disks.' If you don't know your disk type, download NIUBI Partition Editor, and you will see the type of all disks on the main window. If your disk is MBR and already has partitions, you must either delete all partitions before installing the OS or convert the MBR disk to GPT.
You have 3 options to partition a hard drive when installing Windows 11:
- If the disk is GPT and you've installed Windows 10 on it before, you can select the original C drive to install Windows 11. In this case, the partition size and layout remain the same. (If you want to build a dual-boot system, select another partition to install.)
- If this disk is brand new or you deleted all partitions on it, all disk space becomes Unallocated space. Select this Unallocated space to install Windows 11, and the installer will automatically create the C drive along with 3 system-required partitions: EFI, MSR, and Recovery. If you want to create more partitions later, you can shrink the C drive after installation.
![Install without partition]()
- If you manually create several partitions using this Unallocated space and select the first partition to install, you'll get the EFI and MSR partitions on the left of the C drive, the Recovery partition behind the C drive, and other data partitions at the end of the disk.
![]()
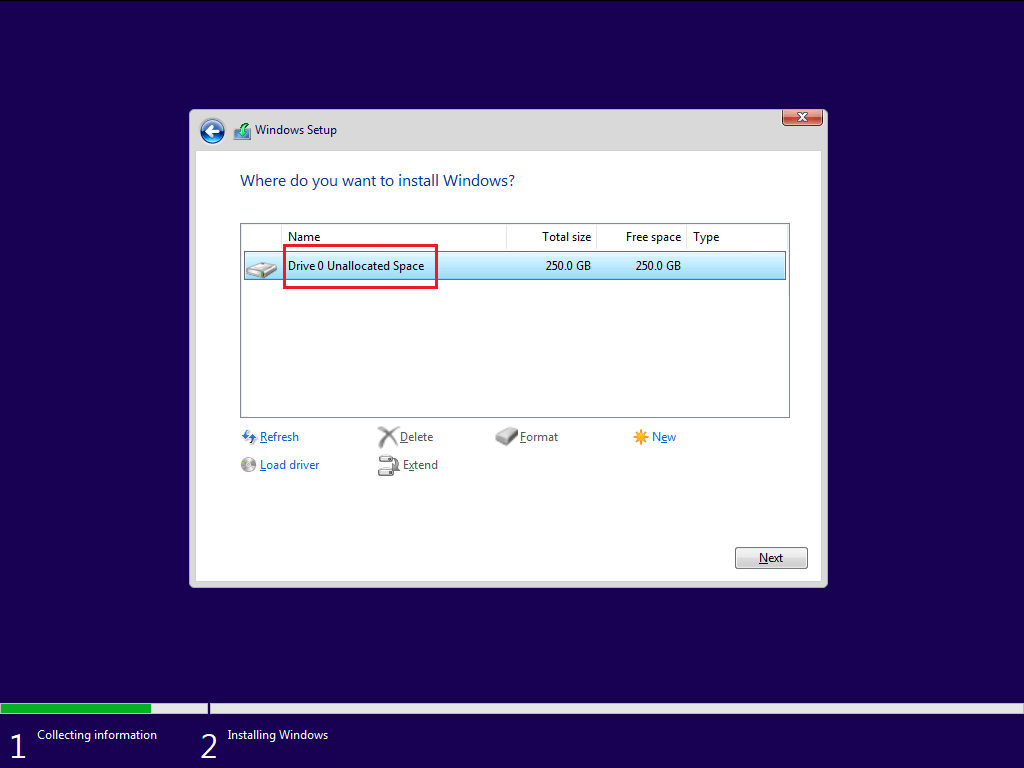
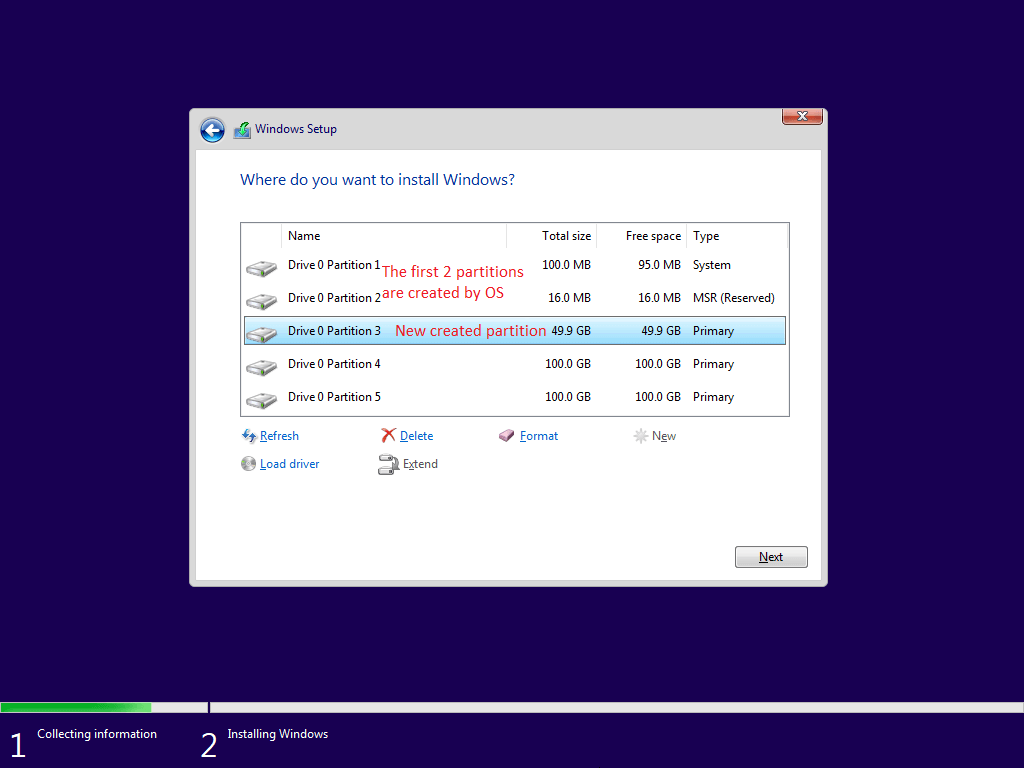
If you manually create several partitions while installing Windows 11, there is a layout problem after installation. A small Recovery partition will be created immediately behind the C drive. When you right-click this Recovery partition in Disk Management, there is only a "Help" option. This means Disk Management cannot shrink or extend this partition. More importantly, you cannot extend the C drive with Disk Management even after deleting the D drive because the Recovery partition blocks the contiguous space.
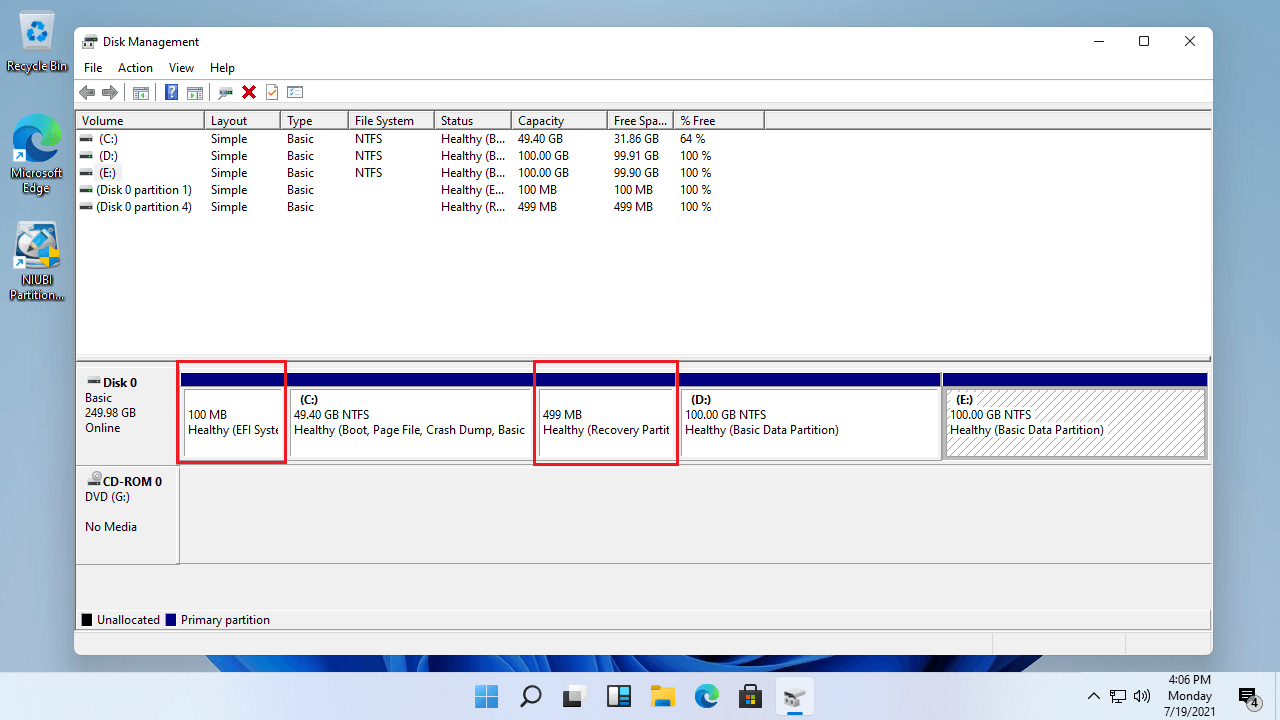
However, it doesn't matter if you've made partitions like that. NIUBI Partition Editor can help you repartition the hard drive without reinstalling Windows 11. It is able to move and extend EFI/Recovery partitions. Because resizing and moving partitions carries inherent risks of system damage and data loss, it is highly recommended to back up your computer in advance and use safe partition software.
Compared to other tools, NIUBI Partition Editor provides advanced data protection technologies to secure your system and data. Furthermore, it has a free edition for Windows 11/10/8/7/Vista/XP home users with the following features.
- Hot Clone - You can clone the system disk before partition modifications or regularly as a backup. In case the source disk fails, you won't lose data and can boot from the cloned disk directly.
- Virtual Mode - all operations are listed as pending for preview, and real disk partitions won't be modified until you click "Apply" to confirm.
- 1-Second Rollback - if it detects any known error while resizing partitions, it automatically reverts the computer to its original status instantly.
- Cancel-at-will - if you applied wrong operations, you can cancel the ongoing tasks at any progress before they finish.
- Advanced file-moving algorithm - shrink, move, and copy partitions 30% to 300% faster.
How to Partition Windows 11 Hard Drive After Installing
Download and launch NIUBI Partition Editor, you'll see all storage devices with partition layout and other information on the main window.
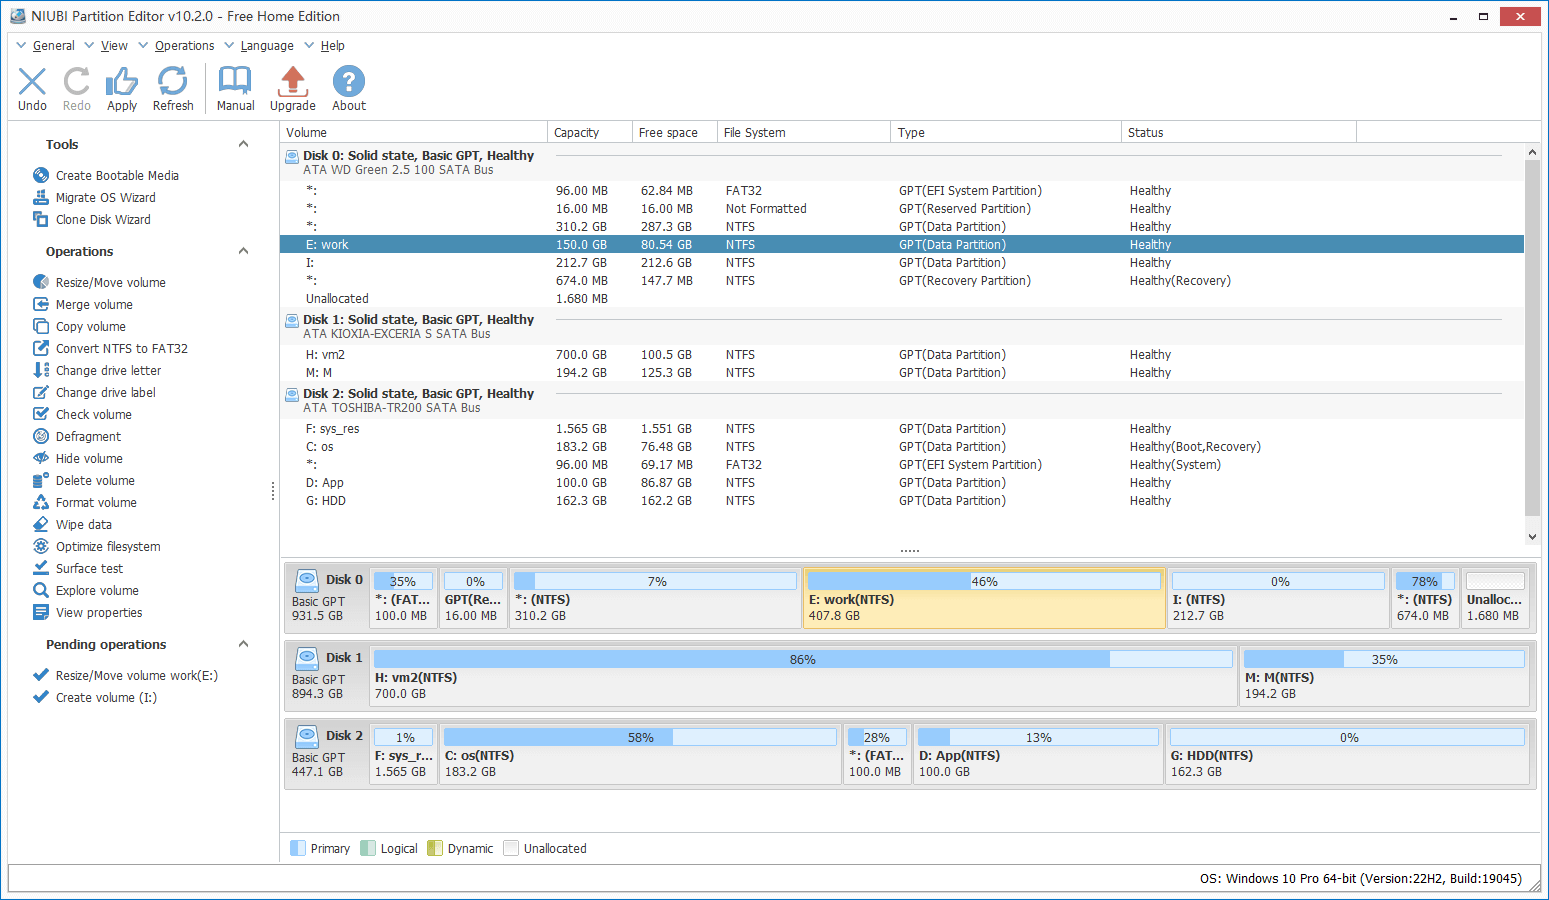
Whether you want to repartition EFI/Recovery or normal data partitions, the methods are exactly the same. Follow the steps to repartition a hard drive in a Windows 11 laptop, desktop, or tablet:
- Right-click any NTFS or FAT32 partition and select "Resize/Move Volume". Drag either border inward in the pop-up window to shrink this partition.
- Right-click a partition with adjacent Unallocated space and select "Resize/Move Volume". Drag the border outward to merge Unallocated space into this partition.
- Right-click a partition with adjacent Unallocated space on either side and select "Resize/Move Volume". Drag the middle of this partition in the pop-up window to move the partition and the Unallocated space.
If you still don't understand how to partition an SSD/HDD in a Windows 11 computer, watch the videos below to see how it works:
- How to reallocate partition size
- How to move Unallocated space and merge to a non-adjacent partition
- How to move and extend EFI/Recovery partitions
Besides repartitioning a hard drive in Windows 11/10/8/7/Vista/XP, NIUBI Partition Editor helps you perform many other disk partition management operations, such as cloning disk partitions, converting partition types, defragging, hiding partitions, scanning bad sectors, and optimizing file systems.
 © 2009 - NIUBI Technology All Rights Reserved. |