When the system partition (C:) is running out of space, many people want to expand it without spending a long time recreating partitions and restoring from backups. To help extend hard drive partition without losing data, Windows Server 2012 and later versions offer the Diskpart command and Disk Management with a GUI. However, due to several limitations, these built-in tools are often of limited help in most cases. This article explains how to extend hard drive in Windows Server 2012/2016/2019/2022 using safe disk partition software.

Restrictions to extend hard drive in Disk Management
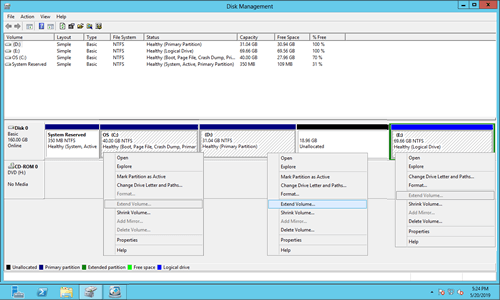
Disk Management (and the Diskpart command) can only help you reduce an allocated partition to create a new volume or extend a hard drive by deleting the contiguous partition on the right. If you want to extend a hard drive by shrinking another partition, neither of these tools can help you, because:
- While shrinking a partition, they can only create unallocated space on the right side.
- The "Extend Volume" function and extend command can only merge unallocated space to the adjacent partition on the left.
- Only NTFS partitions can be shrunk and extended, FAT32 and any other partition types are no supported.
Extend Volume is disabled for C: and E: drive after shrinking D.
Extend Volume greyed out for D: drive after shrinking both C and E.
If you want to extend a partition without using any software, you have only one option: delete the adjacent partition on the right. Additionally, Disk Management has a significant limitation: the partitions to be deleted and extended must be of the same type, either both primary or both logical.
Extend hard drive partition by moving free space
With disk partition software, there are no such limitations. When there is available free space on an adjacent partition, you can shrink it to create unallocated space, which can then be merged with the partition you want to expand. You can also shrink and move unallocated space from a nonadjacent partition on the same disk. All you need to do is drag and drop on the disk map. In this way, the operating system, programs, settings, and everything else remain unchanged.
How to extend hard drive partition in Windows Server 2012/2016/2019/2022:
- Download NIUBI Partition Editor, right-click partition D and select "Resize/Move Volume." To extend the C drive, drag the left border to the right in the pop-up window to create unallocated space on the left. Alternatively, you can drag the right border to the left to create unallocated space on the right.
- Right click C drive and select "Resize/Move Volume" again, drag the right border to the right in the pop-up window to merge this unallocated space.
- Click "Apply" on top left to take effect.
If there is a recovery partition between C and D, or if you want to shrink the nonadjacent partition E to expand C, an additional step is required: you need to move the middle partition to the right to make unallocated space adjacent to the C drive. Follow the steps shown in the video.
Expand hard drive by cloning to a larger disk
In some servers, there may be insufficient free space on a disk. In this case, no software can move free space from a separate disk, as the size of a physical disk is fixed. Alternatively, you can clone the disk to a larger one and then extend the partition to utilize the additional disk space. Follow the steps in the video:
Select the appropriate method based on your disk partition configuration. If you are using any type of hardware RAID, do not break the array or perform any operations on the RAID controller. Instead, follow the same steps above.
Better than other tools, NIUBI Partition Editor offers powerful data protection technology and an advanced algorithm to resize partition more safely and efficiently.
- Virtual Mode: To prevent mistakes, all operations are listed as pending for preview. Real disk partitions are not changed until you click "Apply" to confirm.
- Cancel-at-will: If you apply incorrect operations, you can cancel ongoing tasks without worrying about partition damage.
- 1 Second Rollback: If any error is detected while resizing partitions, the software can automatically revert the server to its original state in an instant.
- Hot Clone: Clone disk partitions without interrupting the server. You can clone the system disk before making changes or as part of a regular backup routine.
- Advanced File-Moving Algorithm: Resize and move partitions 30% to 300% faster, saving significant time, especially when handling a large number of files.
In addition to shrinking and extending hard drive partitions on Windows Server 2012/2016/2019/2022, as well as previous versions like Server 2003/2008, NIUBI Partition Editor helps you move, merge, copy, convert, defrag, hide, wipe, scan partitions, and much more.


