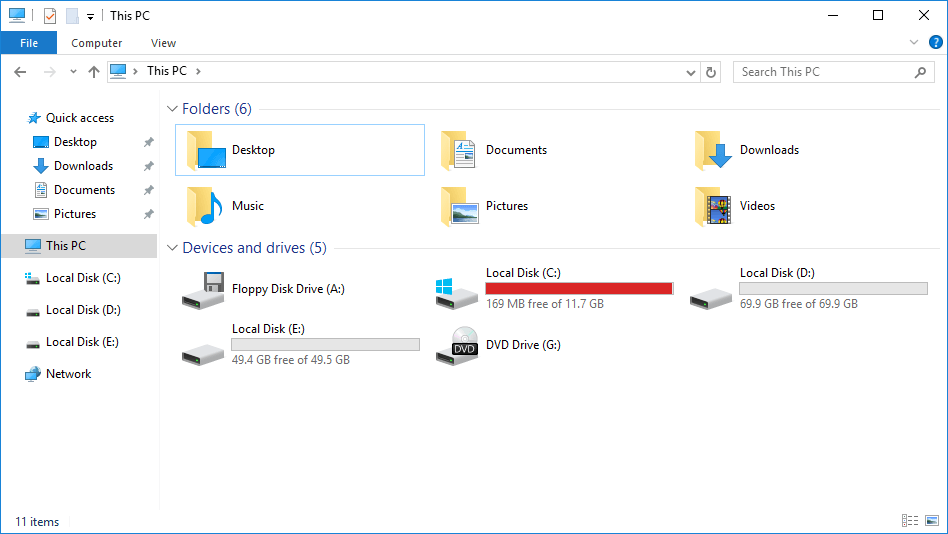
Many administrators encounter the problem of the system C drive running out of space in Windows Server 2016. When this happens, server OEMs often recommend backing up everything, deleting all partitions, and restoring from backup. While this approach eventually works, nobody wants to endure the massive server downtime required to rebuild the entire system. This article explains how to fix the Windows Server 2016 C drive running out of space issue fast and easily.
Step 1 - Free Up Disk Space with Disk Cleanup (Required)
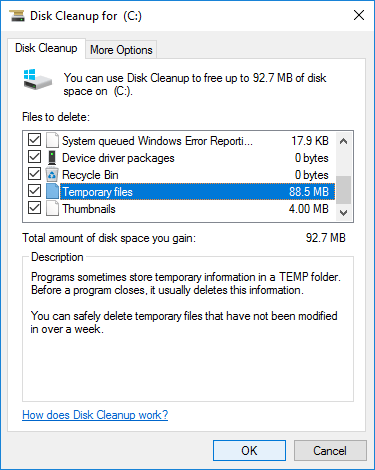
When the system C drive runs low on storage in Windows Server 2016, the first step is to clean up the drive to reclaim valuable space. Even if you cannot reclaim a massive amount of storage, freeing up even a small amount of space ensures that the operating system continues running stably. To help free up disk space, Windows Server 2016 provides a built-in Disk Cleanup utility that can remove common temporary files and unnecessary junk safely.
Steps to clean up disk space in Windows Server 2016 with Disk Cleanup:
- Press Windows + R together on the keyboard to open Run, type cleanmgr and press Enter.
- Select the C: drive from the drop-down menu and click OK.
- Wait for Disk Cleanup to scan junk files and calculate space usage.
- Select the checkboxes next to the files you want to delete and click OK.
- Click Delete Files in the pop-up window to confirm and start deleting.
- (Optional) Repeat the process to delete system-level files.
If you have never cleaned up the drive before, you might reclaim several gigabytes of free space. However, you should proceed directly to Step 3 if you cannot free up more than 20GB of space, as smaller amounts of reclaimed storage can be quickly consumed by new temporary files.
Step 2 - Additional Methods to Reclaim Disk Space (Optional)
If you need to free up more storage space, you can use these four alternative methods to optimize your system drive configuration.
1. Reset Page File
The virtual memory pagefile uses a portion of disk space as virtual RAM, and Windows places it on the C drive by default. You can move it to another partition when the system drive runs short on space.
Steps:
- Press Windows and R to open Run, type sysdm.cpl and press Enter, then switch to the Advanced tab.
- Click Settings under Performance at the top of the System Properties window.
- In the Performance Options window, switch to the Advanced tab and click Change below Virtual memory.
- Uncheck Automatically manage paging file size for all drives, then click C: drive > No paging file > Set. Next, click D or another drive > Custom size > enter an amount > Set. Click OK to confirm. (This adjustment may require a reboot to take effect.)

2. Delete Shadow Copies
If you have enabled Volume Shadow Copy, you can clear older file versions to release storage.
- Open Windows File Explorer.
- Right-click the C drive > click Properties > switch to the Shadow Copies tab.
- Select the previous copies and click Delete Now.

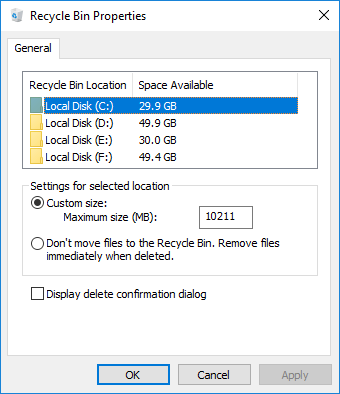
3. Reduce Recycle Bin Size
Files deleted normally are sent to the Recycle Bin, which reserves a percentage of the C drive by default. A large volume of deleted files reduces available space on your system drive. You can decrease its maximum size or move its location to another data partition.
- Right-click the Recycle Bin icon on your desktop and select Properties.
- Select the drive you want to configure for the Recycle Bin.
- Select Custom size, enter a smaller maximum capacity limit, and click OK to confirm.
4. Uninstall Programs
Press Windows and X on the keyboard > select Programs and Features, then uninstall any third-party applications that you no longer need.
Step 3 - Move Free Space from Other Partitions (Required)
The most critical step to permanently resolve the system drive space shortage is allocating more free space from other partitions on the same disk.
In most environments, the primary hard drive contains at least one data partition. You can shrink it using NIUBI Partition Editor to generate unallocated space. After merging the unallocated space into the C drive, it turns into available free capacity. This method allows you to expand your C drive significantly while keeping your operating system, installed programs, and configurations perfectly intact.
Download NIUBI Partition Editor and follow the steps in the video to add more free space to the C drive:

Besides shrinking and extending partitions to transfer free space without data loss, this utility helps you perform many other disk partition management operations in Windows Server 2008/2012/2016/2019/2022/2025 environments.