
After running a Windows server for a period of time, the system C drive frequently runs out of space. When this happens, many administrators ask whether it is possible to change partition size without losing programs or starting over from scratch. The answer is yes. By using safe disk partition tools, you can move available free space from other partitions to the C drive. This article introduces how to change partition size in Windows Server 2019/2022 using native tools and safe partition software without losing data.
Change Partition Size with Windows Server 2019/2022 Disk Management
Like previous versions, Windows Server 2019/2022 includes an integrated Disk Management tool to help administrators change partition size. The Shrink Volume function can decrease an NTFS partition to make free space. Meanwhile, Extend Volume can increase the size of an NTFS partition, but only when there is contiguous Unallocated space on its right side. Consequently, native tools cannot extend a partition by simply shrinking another one. Review the better method to shrink partitions in Windows Server 2019/2022.
Before extending any partition using native tools, Unallocated space must exist on the same disk. To get such space, you must either shrink or delete another partition. The Shrink Volume function can create Unallocated space without losing data, but the resulting Unallocated space cannot be used to extend other volumes. This is because the Extend Volume function only supports adding Unallocated space to the adjacent partition on the left. As shown in the screenshot, the Unallocated space shrunk from drive D is non-adjacent to C and is on the left of E, so Extend Volume is disabled for both partitions.
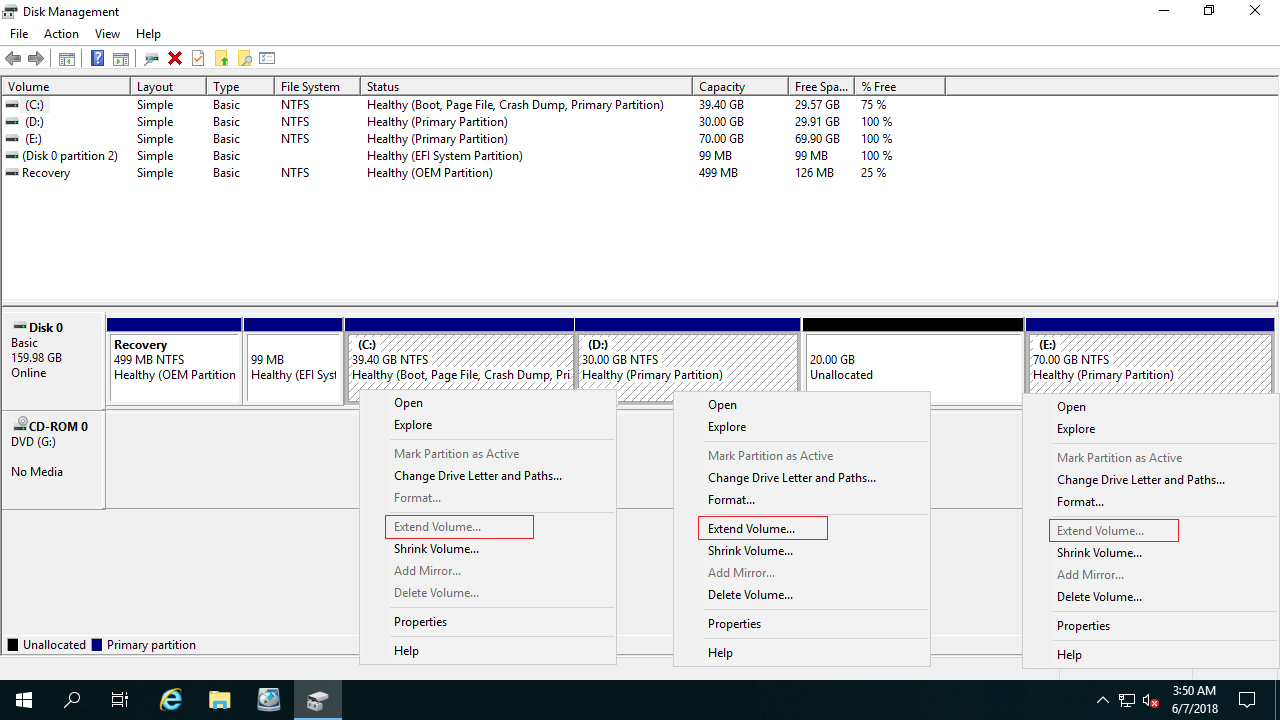
The only way to increase partition size using native tools is by completely deleting the adjacent partition on the right. In addition, the partitions to be extended and deleted must be the same primary or logical drive. If your disk partition layout doesn't meet these requirements, you have to run third-party software.
However, changing partition size carries inherent risks of system damage and data loss. Therefore, it is highly recommended to back up your server in advance and use safe partition software.
Compared to other tools, NIUBI Partition Editor provides advanced data protection technologies to secure your server:
- 1-Second Rollback - if it detects any known error while resizing partitions, it automatically reverts the server to its original status in a flash.
- Cancel-at-will - if you applied wrong operations, you can cancel the ongoing tasks at any progress before they finish.
- Hot Clone - clone disk partitions without server interruption. You can clone the system disk regularly as a backup. Whenever the system disk is down, you can boot from the clone disk directly without wasting time to restore.
- Advanced file-moving algorithm - shrink, move, and copy partitions 30% to 300% faster.
- Virtual Mode - all operations are listed as pending for preview, and real disk partitions won't be modified until you click "Apply" to confirm.
Increase Partition Size with Safe Partition Software
Decreasing or increasing partition size is extremely simple with NIUBI Partition Editor, requiring only a basic drag-and-drop on the graphical disk map.
Steps to decrease partition size in Windows Server 2019/2022:
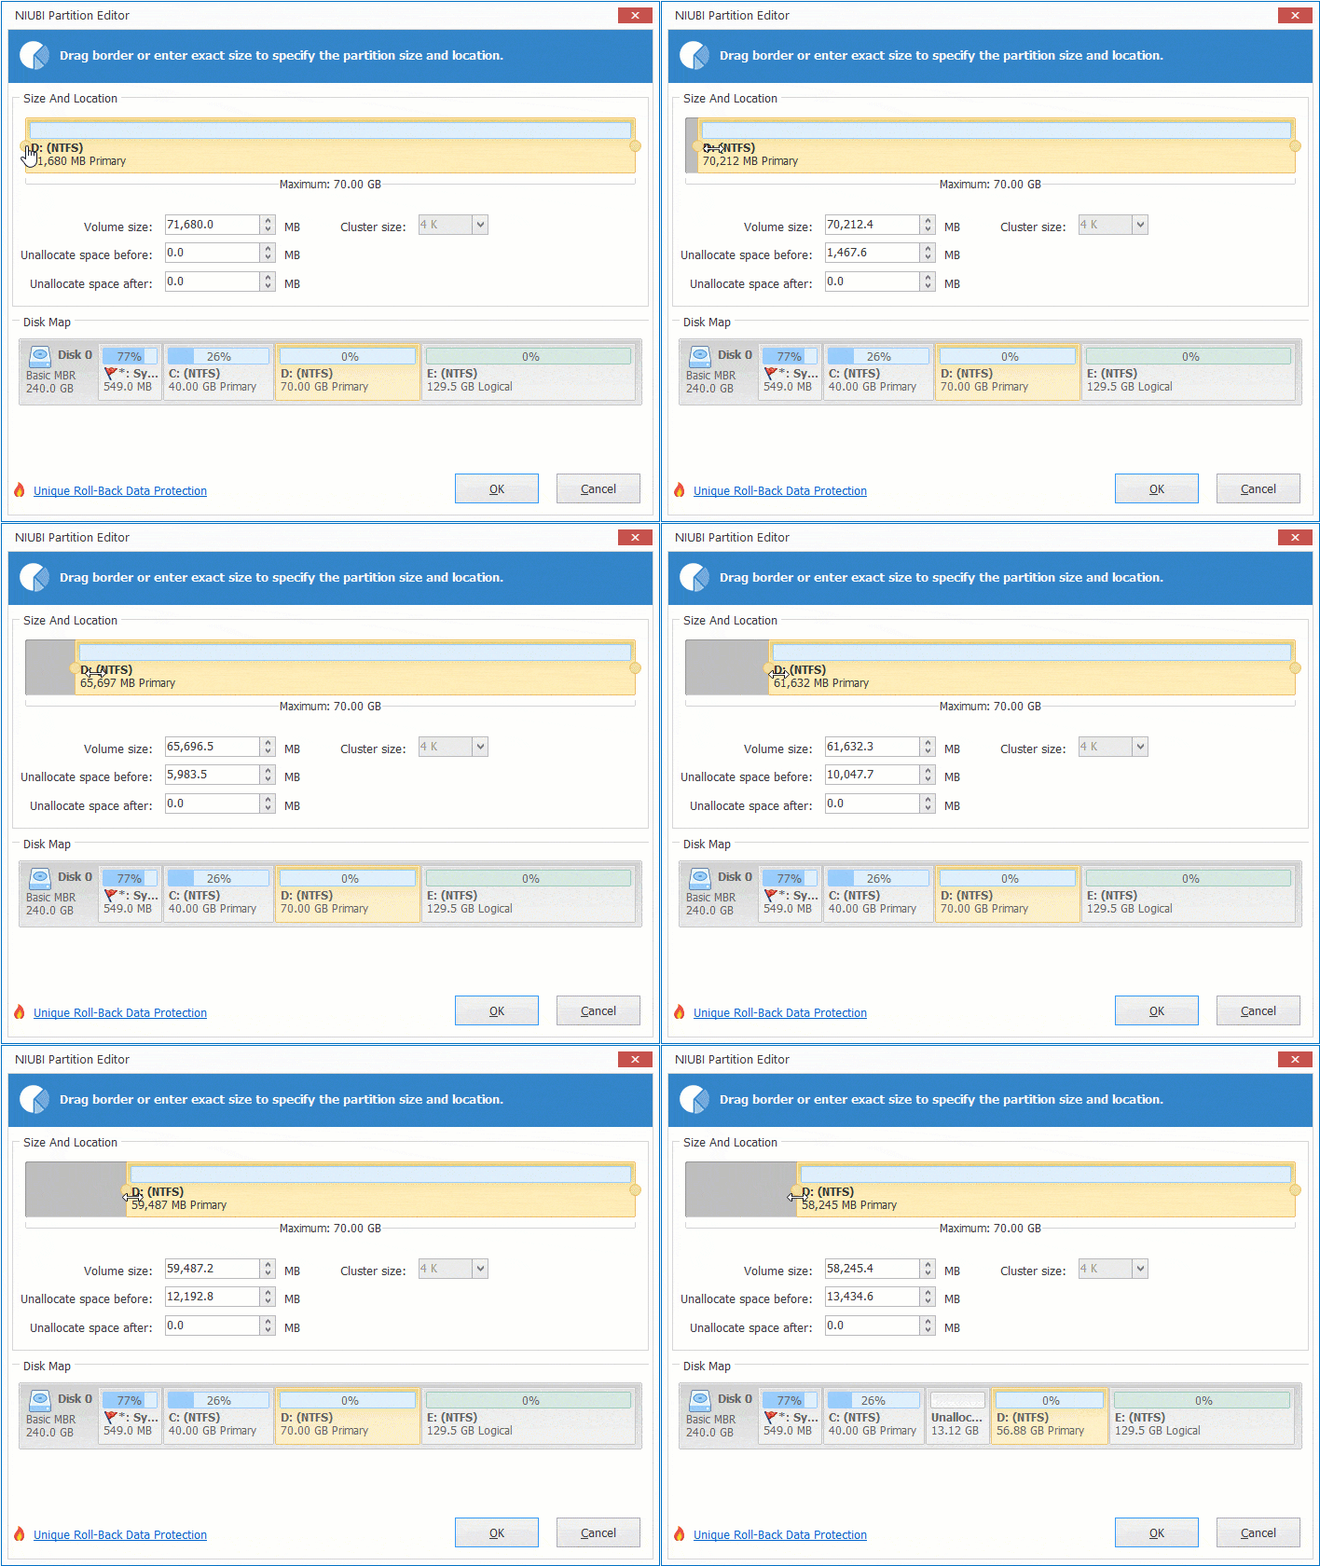
Launch the utility, right-click the target NTFS or FAT32 storage volume (such as drive D:), and select the "Resize/Move Volume" feature.
Option 1: Drag the left border rightward or enter an amount in the box of "Unallocated space before" to make Unallocated space on its left side.
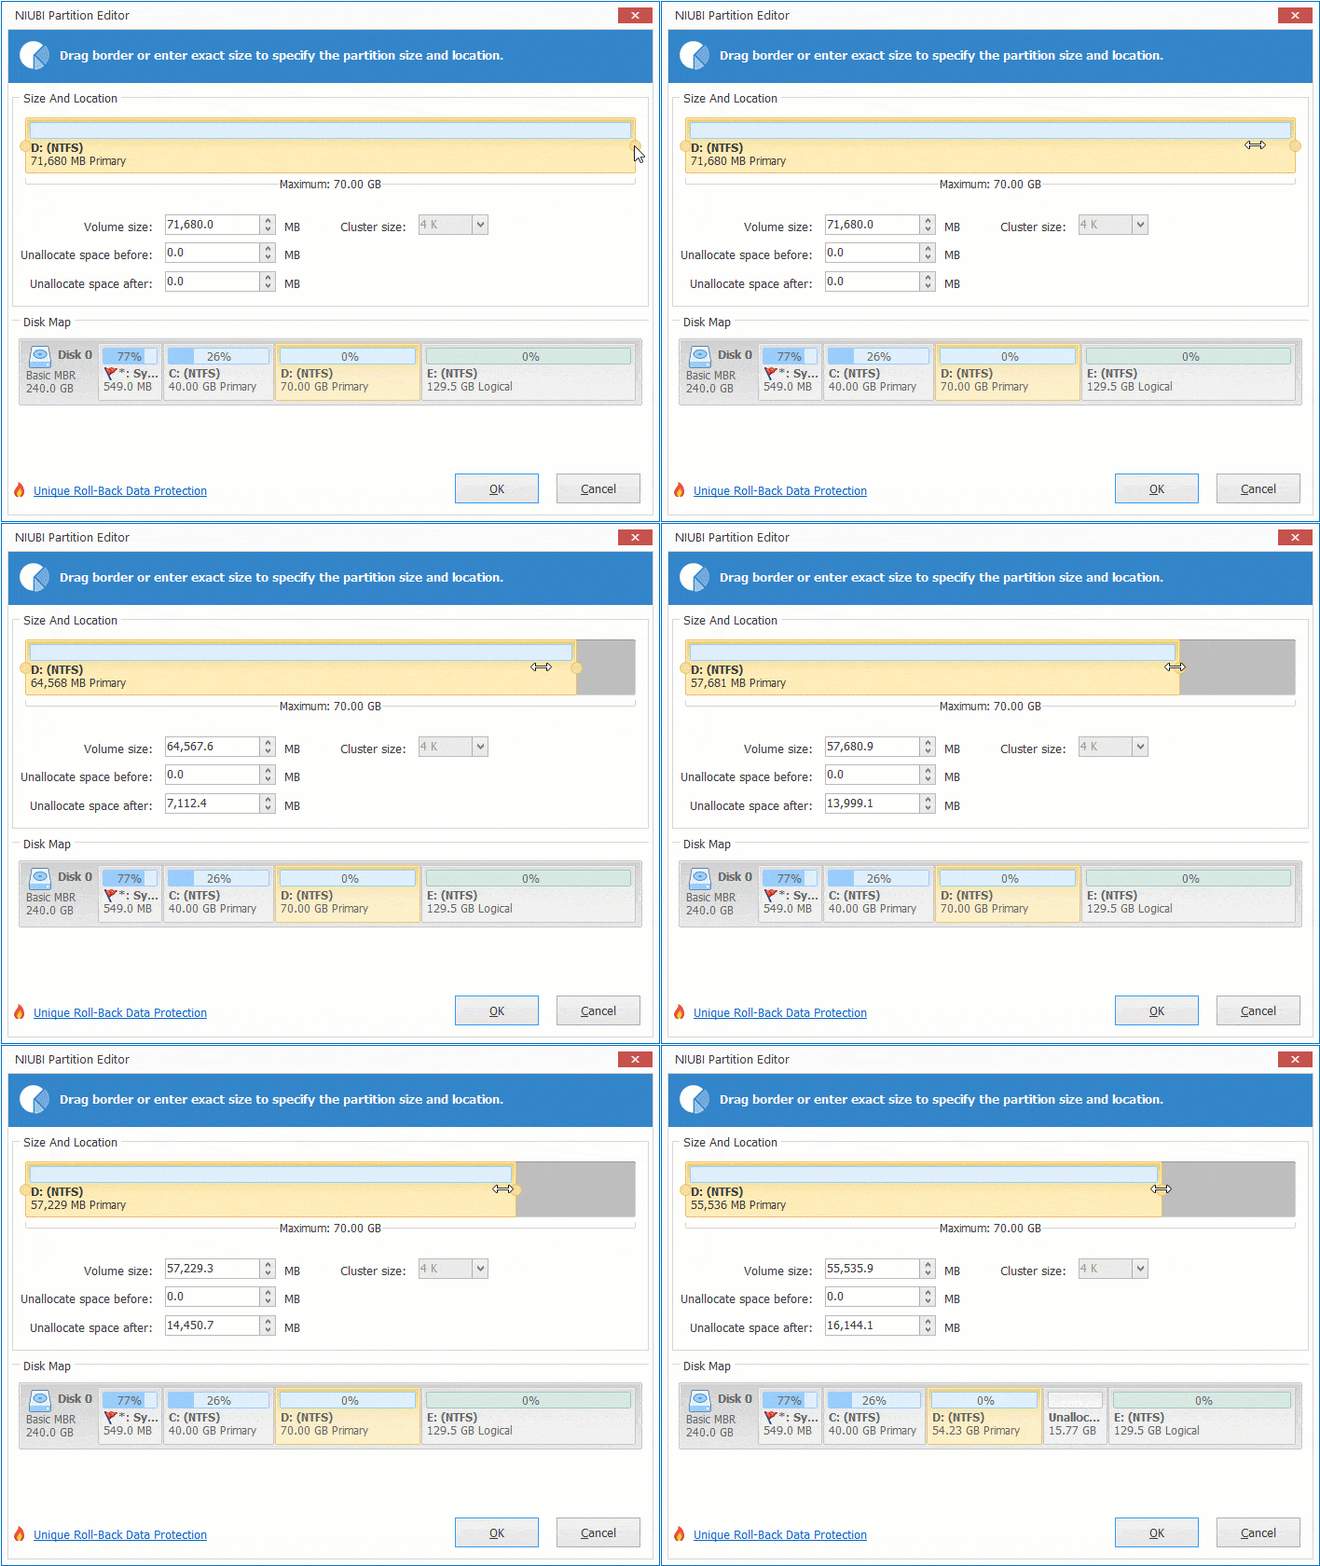
Option 2: Drag the right border leftward or enter an amount in the box of "Unallocated space after" to make Unallocated space on its right side.
Steps to increase partition size in Windows Server 2019/2022 safely:
- Follow Option 1 to shrink drive D: and create Unallocated space on the left side.
- Right-click the system drive C:, select "Resize/Move Volume" again, and drag the right border rightward to combine this Unallocated space.
- Click Apply on the top left to confirm and execute.
If your primary goal is to expand drive E:, create the Unallocated space on the right side when shrinking drive D. Then right-click drive E: and drag its left border leftward to merge the Unallocated space.
- If you want to shrink drive E to extend the C drive, an extra step is required to move Unallocated space to the left before adding it to the C drive.
- Follow the technical guidelines demonstrated in the video tutorial if you need to increase D drive space.
- If your physical hard disk lacks sufficient available free space, follow the instructions to clone disk to a larger one and extend partitions with extra disk space.
- If you did something wrong, simply click Undo on the top left to cancel the pending operations before clicking Apply.
- If you use hardware RAID arrays (like RAID 1, 5, or 10), do not break the array or change settings in the RAID controller. Just follow the same steps above.
Adjust Partition Size Inside VMware/Hyper-V Virtual Machines
To change partition size inside VMware or Hyper-V virtual machines running Windows Server 2019/2022, there is no difference when available free space exists anywhere on the same virtual disk.
When the entire virtual disk is full, you can expand it directly without physical cloning. Follow the steps to increase virtual disk size in VMware or Hyper-V instances. After expanding the disk, the additional space is shown as Unallocated space at the end of the disk. Finally, follow the steps above to add Unallocated space to C drive .
Besides changing partition size in Windows Server 2025/2022/2019, as well as 2016/2012/2008/2003, this reliable server partition software provides a comprehensive toolkit to convert partition types, disk partition clone, erase data, scan bad sectors, merge partitions, and much more.
 © 2009 - NIUBI Technology All Rights Reserved. |